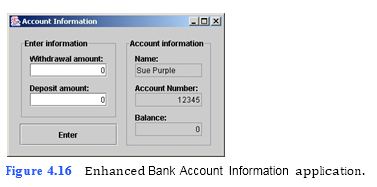
(Enhanced Bank Account Information Application) Modify below to enable the user to input both a withdrawal amount and a deposit amount (Fig. 4.16). When the Enter JButton is clicked, the balance is updated appropriately.
a) Copying the template to your working directory. Copy the C:Examples Tutorial04ExercisesAccountInformationEnhancement directory to your C:SimplyJava directory.
b) Opening the Command Prompt window and changing directories. Open the Com- mand Prompt window by selecting Start > Programs > Accessories > Command Prompt. Change to your working directory by typing cd C:SimplyJava AccountInformationEnhancement.
c) Compiling the template application. Compile your application by typing javac
AccountInformation.java. JTextField, then press the Enter JButton. The Balance: JTextField should now contain 100, and the Deposit amount: JTextField should now contain 0.
d) Running the template application. Run the enhanced Bank Account Information template application by typing java AccountInformation. Type 50 in the With- drawal amount: JTextField and type 100 in the Deposit amount: JTextField. When you press the Enter JButton, notice that the balance does not
```
1 // AccountInformation.java
2 // This application inputs and outputs account information.
3 import java.awt.*;
4 import java.awt.event.*;
5 import javax.swing.*;
6 import javax.swing.border.*;
7
8 public class AccountInformation extends JFrame
9 {
10 // JPanel to group withdrawal and deposit components
11 private JPanel enterJPanel;
12
13 // JLabel and JTextField for withdrawals
14 private JLabel withdrawalJLabel;
15 private JTextField withdrawalJTextField;
16
17 // JLabel and JTextField for deposits
18 private JLabel depositJLabel;
19 private JTextField depositJTextField;
20
21 // JButton to initiate balance calculation
22 private JButton enterJButton;
23
24 // JPanel to group account information components
25 private JPanel accountJPanel;
26
27 // JLabel and JTextField for account holder's name
28 private JLabel nameJLabel;
29 private JTextField nameJTextField;
30
31 // JLabel and JTextField for account number
32 private JLabel accountNumberJLabel;
33 private JTextField accountNumberJTextField;
34
35 // JLabel and JTextField for balance
36 private JLabel balanceJLabel;
37 private JTextField balanceJTextField;
38
39 // no-argument constructor
40 public AccountInformation()
41 {
42 createUserInterface();
43 }
44
45 // create and position GUI components; register event handlers
46 private void createUserInterface()
47 {
48 // get content pane and set layout to null
49 Container contentPane = getContentPane();
50 contentPane.setLayout( null );
51
52 // set up enterJPanel
53 enterJPanel = new JPanel();
54 enterJPanel.setLayout( null );
55 enterJPanel.setBounds( 16, 16, 152, 126 );
56 enterJPanel.setBorder(
57 new TitledBorder( "Enter information" ) );
58 contentPane.add( enterJPanel );
59
60 // set up withdrawalJLabel
61 withdrawalJLabel = new JLabel();
62 withdrawalJLabel.setText( "Withdrawal amount:" );
63 withdrawalJLabel.setBounds( 16, 24, 150, 16 );
64 enterJPanel.add( withdrawalJLabel );
65
66 // set up withdrawalJTextField
67 withdrawalJTextField = new JTextField();
68 withdrawalJTextField.setText( "0" );
69 withdrawalJTextField.setBounds( 16, 40, 120, 21 );
70 withdrawalJTextField.setHorizontalAlignment(
71 JTextField.RIGHT );
72 enterJPanel.add( withdrawalJTextField );
73
74 // set up depositJLabel
75 depositJLabel = new JLabel();
76 depositJLabel.setText( "Deposit amount:" );
77 depositJLabel.setBounds( 16, 70, 140, 16 );
78 enterJPanel.add( depositJLabel );
79
80 // set up depositJTextField
81 depositJTextField = new JTextField();
82 depositJTextField.setText( "0" );
83 depositJTextField.setBounds( 16, 86, 120, 21 );
84 depositJTextField.setHorizontalAlignment( JTextField.RIGHT );
85 enterJPanel.add( depositJTextField );
86
87 // set up enterJButton
88 enterJButton = new JButton();
89 enterJButton.setText( "Enter" );
90 enterJButton.setBounds( 16, 150, 152, 34 );
91 contentPane.add( enterJButton );
92 enterJButton.addActionListener(
93
94 new ActionListener() // anonymous inner class
95 {
96 // event handler called when enterJButton is pressed
97 public void actionPerformed( ActionEvent event )
98 {
99 enterJButtonActionPerformed( event );
100 }
101
102 } // end anonymous inner class
103
104 ); // end call to addActionListener
105
106 // set up accountJPanel
107 accountJPanel = new JPanel();
108 accountJPanel.setLayout( null );
109 accountJPanel.setBounds( 180, 16, 136, 170 );
110 accountJPanel.setBorder(
111 new TitledBorder( "Account information" ) );
112 contentPane.add( accountJPanel );
113
114 // set up nameJLabel
115 nameJLabel = new JLabel();
116 nameJLabel.setText( "Name:" );
117 nameJLabel.setBounds( 16, 24, 100, 16 );
118 accountJPanel.add( nameJLabel );
119
120 // set up nameJTextField
121 nameJTextField = new JTextField();
122 nameJTextField.setText( "Sue Purple" );
123 nameJTextField.setBounds( 16, 40, 104, 21 );
124 nameJTextField.setEditable( false );
125 accountJPanel.add( nameJTextField );
126
127 // set up accountNumberJLabel
128 accountNumberJLabel = new JLabel();
129 accountNumberJLabel.setText( "Account Number:" );
130 accountNumberJLabel.setBounds( 16, 70, 140, 16 );
131 accountJPanel.add( accountNumberJLabel );
132
133 // set up accountNumberJTextField
134 accountNumberJTextField = new JTextField();
135 accountNumberJTextField.setText( "12345" );
136 accountNumberJTextField.setBounds( 16, 86, 104, 21 );
137 accountNumberJTextField.setEditable( false );
138 accountNumberJTextField.setHorizontalAlignment(
139 JTextField.RIGHT );
140 accountJPanel.add( accountNumberJTextField );
141
142 // set up balanceJLabel
143 balanceJLabel = new JLabel();
144 balanceJLabel.setText( "Balance:" );
145 balanceJLabel.setBounds( 16, 116, 100, 16 );
146 accountJPanel.add( balanceJLabel );
147
148 // set up balanceJTextField
149 balanceJTextField = new JTextField();
150 balanceJTextField.setText( "0" );
151 balanceJTextField.setBounds( 16, 132, 104, 21 );
152 balanceJTextField.setEditable( false );
153 balanceJTextField.setHorizontalAlignment( JTextField.RIGHT );
154 accountJPanel.add( balanceJTextField );
155
156 // set properties of application’s window
157 setTitle( "Account Information" ); // set title bar text
158 setSize( 340, 225 ); // set window's size
159 setVisible( true ); // display window
160
161 } // end method createUserInterface
162
163 // update account balance based on user input
164 private void enterJButtonActionPerformed( ActionEvent event )
165 {
166 // display new balance
167 balanceJTextField.setText( String.valueOf(
168 Integer.parseInt( balanceJTextField.getText() ) +
169 Integer.parseInt( depositJTextField.getText() ) -
170 Integer.parseInt( withdrawalJTextField.getText() ) ) );
171
172 // clear depositJTextField and withdrawalJTextField
173 depositJTextField.setText( "0" );
174 withdrawalJTextField.setText( "0" );
175
176 } // end method enterJButtonActionPerformed
177
178 // main method
179 public static void main( String args[] )
180 {
181 AccountInformation application = new AccountInformation();
182 application.setDefaultCloseOperation( JFrame.EXIT_ON_CLOSE );
183
184 } // end method main
185
186 } // end class AccountInformation
```
You might also like to view...
?As a project manager, you would use the stakeholder analysis matrix to manage communications with external entities such as customers, vendors, and regulatory bodies.
Answer the following statement true (T) or false (F)
You can add fields besides those listed by tapping or clicking the All Fields button.
Answer the following statement true (T) or false (F)
A(n) ____ variable is any group of characters, such as "Hello" or "Happy Holidays!".
A. Boolean B. data C. text string D. null
Briefly describe how to configure WPA2 Personal to be used on a wireless network. Implementing WPA2 Personal involves turning it on at the wireless router and then entering a key value on each authorized device that has been preapproved to join the Wi-Fi network. In the wireless router configuration settings there are two steps that must be performed. First, the WPA2 Personal security option, which may be labeled as WPA2-PSK [AES], is turned on by clicking the appropriate option button. Second, a key value, sometimes called a preshared key (PSK), WPA2 shared key, or passphrase, must be entered. This key value can be from 8 to 63 characters in length.
What will be an ideal response?